


Anime Figurine Photography! Part 1
No way do I consider that I'm an expert in figurine photography. I started taking photos of my figures in November last year (I think.....) and I've been snapping away ever since!
I'm really short of resources to set up a decent studio here. First, I lack the proper light sources: I don't have any decent lamps (I'm stuck with one lousy incandescent table lamp) and the only white-light I have is the tube light above my sink. Second, I don't have other miscellaneous items like a tripod or large pieces of paper to be used as a screen. Lastly, I don't even have my own camera! (I've been using my friend's Fuji Finepix F610).
Anyway, so I've been trying to make do with what I have to set up a makeshift studio (eg. CDs and books make a great tripod and Blue-tac is also a must for taking photos at an angle!). When it comes to actual photography skills, I've basically been learning from trial and error: experimenting with the settings on the camera, finding the best lighting on the figurine etc etc. I mean, I must've learnt something after taking nearly a 1000 of photos!
Here are some excellent tutorials which I've found on this kind of photography. They are really helpful for all beginners like me.
From KFCHONG's site:
Model Photography for Beginner
Photo Touch-Up
This one is a post taken from the Machine Mess Scale Modeling Community Forum. The author is someone called hendralely and all credit goes to him.
See also:
Anime Figurine Photography! Part 2
Topic: Photography Tips #1: White Balance
Hi all,
First of all, I'm not trying to be a wise-ass teaching people simple stuff like this. I'm just merely sharing my little photography knowledge. I don't claim that my photos are great either.
The main purpose here is to encourage people to take more photos of their models and share it here with all of us.
This tip is targeted for digital camera users even though I will mention about film cameras as well.
So here goes:
I've seen a lot of modellers out there who has problem with photographing their models. The #1 gripe is how the photos don't show the correct color of the model. Some are yellowish, some are blueish, etc.
As we all know, photography is all about lighting. The cause of this incorrect color problem is also lighting.
There are many light sources in real life: light bulb, fluorescent lamp, table lamp, sunlight, etc.
These light sources have different colors, which can affect how the eyes see the color of the object (the model).
What is white balance?
In film camera, the camera just captures the light spectrums, making the negative film. This negative will then have to be developed to make the real photo. The developer will then have to make out the color, thus guessing how the color should turn out. This process is merely guessing, thus can cause the color incorrect. That's why we sometimes wonder why the same negative developed in photo center A can have different result with photo center B. And that's also why professionals develop their own photos themselves, because they know how the correct colors are.
In digital camera, this process is done in the camera itself, thus resulting in "real color" photos. So as those photo developers, the camera also guesses the right color by guessing the color of the light source. Now this what makes the object color incorrect also.
So, how do we solve this problem you ask?
The answer is to tell the camera what the light source color is. Tell it how white color should look like, thus the term "white balance".
Camera's white balance
Most digital cameras work with "Auto white balance" by factory default settings. And I'm sure most of us don't bother changing it since it's fairly correct anyway. The better the camera, the more clever the auto white balance is. White balance of most cameras though, works best on bright sunlight (average color temperature). That's why many like to take model photos on bright sunny day (Fichtenfoo for example).
I personally, like to take stationery objects on a closed room with my own light source. I like to have control on the light source.
Like I said, the auto white balance is fairly correct. But fairly correct is not necessarily correct. We want to be picky so we have to use the "white balance set" mode. We tell the camera what the white should be under the light source.
Most digital cameras have the "white balance set" mode (name may differ). Even the lower-end ones. But I'll let you check your camera's manual for that.
This is how to set the white balance:
- Set your tabletop studio
- Turn on all the light source
- Put a sheet of white or 18% grey paper on where the object/model will be
- Set the camera to "white balance set" mode
- Position and point the camera to the white paper. Tripod is highly recommended.
- Point until the frame is full with the white paper. Zoom if you can and must.
- Set the white balance (refer to camera's manual).
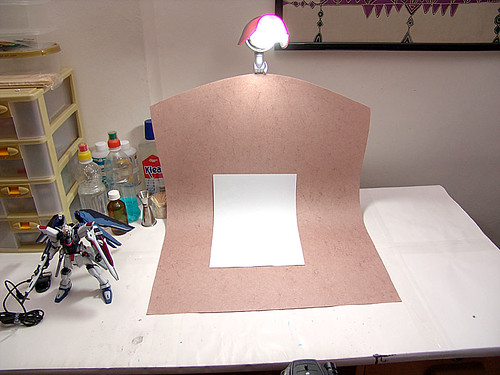
Here's a picture of my "tabletop studio" when I took photos of my Freedom:
Then after that, just shoot and shoot.
Hope this tip helps.
Thanks for reading!
I'm really short of resources to set up a decent studio here. First, I lack the proper light sources: I don't have any decent lamps (I'm stuck with one lousy incandescent table lamp) and the only white-light I have is the tube light above my sink. Second, I don't have other miscellaneous items like a tripod or large pieces of paper to be used as a screen. Lastly, I don't even have my own camera! (I've been using my friend's Fuji Finepix F610).
Anyway, so I've been trying to make do with what I have to set up a makeshift studio (eg. CDs and books make a great tripod and Blue-tac is also a must for taking photos at an angle!). When it comes to actual photography skills, I've basically been learning from trial and error: experimenting with the settings on the camera, finding the best lighting on the figurine etc etc. I mean, I must've learnt something after taking nearly a 1000 of photos!
Here are some excellent tutorials which I've found on this kind of photography. They are really helpful for all beginners like me.
From KFCHONG's site:
Model Photography for Beginner
Photo Touch-Up
This one is a post taken from the Machine Mess Scale Modeling Community Forum. The author is someone called hendralely and all credit goes to him.
See also:
Anime Figurine Photography! Part 2
Topic: Photography Tips #1: White Balance
Hi all,
First of all, I'm not trying to be a wise-ass teaching people simple stuff like this. I'm just merely sharing my little photography knowledge. I don't claim that my photos are great either.
The main purpose here is to encourage people to take more photos of their models and share it here with all of us.
This tip is targeted for digital camera users even though I will mention about film cameras as well.
So here goes:
I've seen a lot of modellers out there who has problem with photographing their models. The #1 gripe is how the photos don't show the correct color of the model. Some are yellowish, some are blueish, etc.
As we all know, photography is all about lighting. The cause of this incorrect color problem is also lighting.
There are many light sources in real life: light bulb, fluorescent lamp, table lamp, sunlight, etc.
These light sources have different colors, which can affect how the eyes see the color of the object (the model).
What is white balance?
In film camera, the camera just captures the light spectrums, making the negative film. This negative will then have to be developed to make the real photo. The developer will then have to make out the color, thus guessing how the color should turn out. This process is merely guessing, thus can cause the color incorrect. That's why we sometimes wonder why the same negative developed in photo center A can have different result with photo center B. And that's also why professionals develop their own photos themselves, because they know how the correct colors are.
In digital camera, this process is done in the camera itself, thus resulting in "real color" photos. So as those photo developers, the camera also guesses the right color by guessing the color of the light source. Now this what makes the object color incorrect also.
So, how do we solve this problem you ask?
The answer is to tell the camera what the light source color is. Tell it how white color should look like, thus the term "white balance".
Camera's white balance
Most digital cameras work with "Auto white balance" by factory default settings. And I'm sure most of us don't bother changing it since it's fairly correct anyway. The better the camera, the more clever the auto white balance is. White balance of most cameras though, works best on bright sunlight (average color temperature). That's why many like to take model photos on bright sunny day (Fichtenfoo for example).
I personally, like to take stationery objects on a closed room with my own light source. I like to have control on the light source.
Like I said, the auto white balance is fairly correct. But fairly correct is not necessarily correct. We want to be picky so we have to use the "white balance set" mode. We tell the camera what the white should be under the light source.
Most digital cameras have the "white balance set" mode (name may differ). Even the lower-end ones. But I'll let you check your camera's manual for that.
This is how to set the white balance:
- Set your tabletop studio
- Turn on all the light source
- Put a sheet of white or 18% grey paper on where the object/model will be
- Set the camera to "white balance set" mode
- Position and point the camera to the white paper. Tripod is highly recommended.
- Point until the frame is full with the white paper. Zoom if you can and must.
- Set the white balance (refer to camera's manual).
Here's a picture of my "tabletop studio" when I took photos of my Freedom:
Then after that, just shoot and shoot.
Hope this tip helps.
Thanks for reading!
posted by Cloud at 5:15 AM
![]()
![]()

0 Comments:
Post a Comment
<< Home