


Anime Figurine Photography! Part 2
This is continued from the previous post on photography. It's taken from the Machine Mess Scale Modeling Community Forum. The author is someone called hendralely and all credit goes to him.
See also:
Anime Figurine Photography! Part 1
Anime Figurine Photography! Part 3
Topic: Photography Tips #2: Light Source
Light Source
Photography is all about lighting. Best photographs are taken in a lighting controlled rooms (studios). Lighting equipment in professional photography is considered more important and more expensive than the camera itself. You can have a 12 thousand dollar Canon 1DS, but a 2 Megapixel camera can outshine it if lighting is taken seriously and well.
OK, forget about the professional talk, it's overkill for most of us. That was just a lame opening.
The purpose here is how we can make use of our own lighting to make good tabletop photos.
Good photos are those with good exposure, no washed out area, and no harsh shadow. To achieve that, the light has to be soft.
The bigger the light source, the softer the light. The more distance between the light source and the object, the softer the light.
There are a few light sources which we can use in our own home tabletop photography:
1. Sunlight. This is the most favorite light source of modellers. Why? Because the source is the sun. It's BIG. And the distance is far. Thus the light is very soft. Well except in a very bright day. But even that it's still good for tabletop photography.
The thing I don't like about using sunlight is because we can't control the intensity, and we can't control the distance either. And for my case, my table is not positioned next to the window. And I only spend 2 days a week on afternoon at home.
2. Table lamp. This is my favorite because most of us likely to already have one. Some even comes with dimmer, allowing us to control the intensity. Adjusting distance is no sweat at all.
What worries most people about using table lamp is the light color. Some are bluish, some are yellowish, some are even redish. But fret not, this isn't a problem at all if we set the white balance of the camera. No matter what the color of the light, your photo will come out clear, and the object color will match the original color. You can even use your retro blue neon lamp you still have in your store room from the 80's.
More on table lamp later.
3. Flash light. This one people tend to stay away from. Some even swear not to use it on tabletop photography. Well not to use flash is only half true. More on this later.
Table Lamp
I use table lamp for my tabletop photography. I like it for the reasons mentioned above. My only gripe with my table lamp is it's not long/high enough (shoud've got a longer legged one).
This is the my "tabletop studio" photo I took a few days ago when shooting the Freedom:
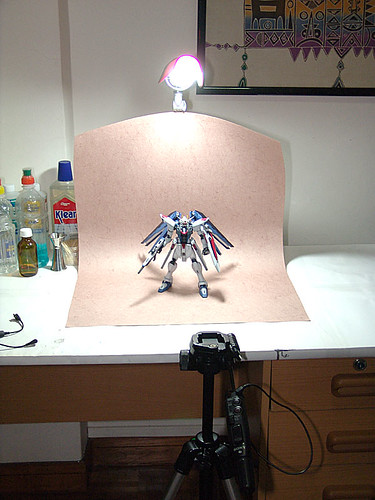
As you can see, it's not long enough, making the lamp positioned right on top of the model, not covering the front area of the model. The other problem is that since I can't control the intensity, the lamp creates a harsh shadow below the model.
So how do I fix this problem?
Fill Flash
Fill flash is the term used in photography for using flash light to cover shadowed area. Most common usage is when photographing a person with sunlight behind the person. We use fill flash to "fill" the shadowed front area (face).
As in my case with my table lamp, the light only covers the top and behind area (not that we care of), leaving the front area shadowed.
Since I don't have another table lamp, I use my external flash to cover this area. I also need some light to remove/reduce the shadow below the model. To achieve this, I need a light coming around 45 degrees from above the model. There's no way a built-in flash can do that since it's fixed on the camera. But external flash can do that. I plug the external flash cable to the camera, point it to the top back of the room, and shoot. The light will be bounced back to the model, making the light source bigger, thus softer.
As the result, I get this:
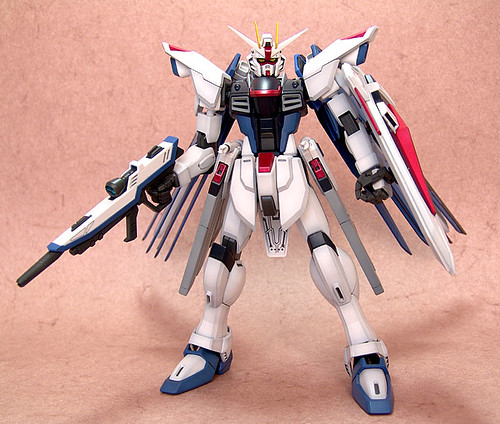
The front is covered well, and the shadow is not too harsh. Much better. But I can still see some improvement I can make next time.
Notice how the top area is a bit washed out? And there's still shadow? I need to soften the table lamp. Next time, I will put a layer or two tissue paper on the lamp, making it softer.
Instead of using external flash, the same thing can be achieved using another table lamp, pointed to the front of the model. You can have an assistant to do that. Don't forget to adjust the distance.
Why Can't We Use Flash?
Well like I said, it's just half true. We CAN use flash, but not DIRECT flash. Direct flash light will be to strong. Even on my external flash which I can set the intensity, the lowest power is still to strong, not to mention using built-in flash. Especially since in tabletop photography, the distance betwee the camera and the object is very close.
Another reason why direct flash is not recommended is because the light direction comes in straight angle to the object, leaving the shadow on the back. Very unnatural.
So if you want to use flash, use bounce flash.
OK, that's all for this folks. Hope this can help.
Any questions, just throw it in.
Thanks for reading!
See also:
Anime Figurine Photography! Part 1
Anime Figurine Photography! Part 3
Topic: Photography Tips #2: Light Source
Light Source
Photography is all about lighting. Best photographs are taken in a lighting controlled rooms (studios). Lighting equipment in professional photography is considered more important and more expensive than the camera itself. You can have a 12 thousand dollar Canon 1DS, but a 2 Megapixel camera can outshine it if lighting is taken seriously and well.
OK, forget about the professional talk, it's overkill for most of us. That was just a lame opening.
The purpose here is how we can make use of our own lighting to make good tabletop photos.
Good photos are those with good exposure, no washed out area, and no harsh shadow. To achieve that, the light has to be soft.
The bigger the light source, the softer the light. The more distance between the light source and the object, the softer the light.
There are a few light sources which we can use in our own home tabletop photography:
1. Sunlight. This is the most favorite light source of modellers. Why? Because the source is the sun. It's BIG. And the distance is far. Thus the light is very soft. Well except in a very bright day. But even that it's still good for tabletop photography.
The thing I don't like about using sunlight is because we can't control the intensity, and we can't control the distance either. And for my case, my table is not positioned next to the window. And I only spend 2 days a week on afternoon at home.
2. Table lamp. This is my favorite because most of us likely to already have one. Some even comes with dimmer, allowing us to control the intensity. Adjusting distance is no sweat at all.
What worries most people about using table lamp is the light color. Some are bluish, some are yellowish, some are even redish. But fret not, this isn't a problem at all if we set the white balance of the camera. No matter what the color of the light, your photo will come out clear, and the object color will match the original color. You can even use your retro blue neon lamp you still have in your store room from the 80's.
More on table lamp later.
3. Flash light. This one people tend to stay away from. Some even swear not to use it on tabletop photography. Well not to use flash is only half true. More on this later.
Table Lamp
I use table lamp for my tabletop photography. I like it for the reasons mentioned above. My only gripe with my table lamp is it's not long/high enough (shoud've got a longer legged one).
This is the my "tabletop studio" photo I took a few days ago when shooting the Freedom:
As you can see, it's not long enough, making the lamp positioned right on top of the model, not covering the front area of the model. The other problem is that since I can't control the intensity, the lamp creates a harsh shadow below the model.
So how do I fix this problem?
Fill Flash
Fill flash is the term used in photography for using flash light to cover shadowed area. Most common usage is when photographing a person with sunlight behind the person. We use fill flash to "fill" the shadowed front area (face).
As in my case with my table lamp, the light only covers the top and behind area (not that we care of), leaving the front area shadowed.
Since I don't have another table lamp, I use my external flash to cover this area. I also need some light to remove/reduce the shadow below the model. To achieve this, I need a light coming around 45 degrees from above the model. There's no way a built-in flash can do that since it's fixed on the camera. But external flash can do that. I plug the external flash cable to the camera, point it to the top back of the room, and shoot. The light will be bounced back to the model, making the light source bigger, thus softer.
As the result, I get this:
The front is covered well, and the shadow is not too harsh. Much better. But I can still see some improvement I can make next time.
Notice how the top area is a bit washed out? And there's still shadow? I need to soften the table lamp. Next time, I will put a layer or two tissue paper on the lamp, making it softer.
Instead of using external flash, the same thing can be achieved using another table lamp, pointed to the front of the model. You can have an assistant to do that. Don't forget to adjust the distance.
Why Can't We Use Flash?
Well like I said, it's just half true. We CAN use flash, but not DIRECT flash. Direct flash light will be to strong. Even on my external flash which I can set the intensity, the lowest power is still to strong, not to mention using built-in flash. Especially since in tabletop photography, the distance betwee the camera and the object is very close.
Another reason why direct flash is not recommended is because the light direction comes in straight angle to the object, leaving the shadow on the back. Very unnatural.
So if you want to use flash, use bounce flash.
OK, that's all for this folks. Hope this can help.
Any questions, just throw it in.
Thanks for reading!
posted by Cloud at 1:33 AM
![]()
![]()
1 Comments:
Thanks forr sharing
Post a Comment
<< Home