


Anime Figurine Photography! Part 3
I've found another excellent figurine photography tutorial a few weeks back. This tutorial is written by SuperRats of happysoda.com. This guy is seriously one of the best anime figures photographer out there with excellent skills as well as artistic tastes (in terms of figurine photography, of course). Take a look in the gallery on his site and you'll know what I'm talking about. I've taken the entire tutorial and posted it here. It focuses on the lighting set-up for a decent photoshoot and the different types of lamps to be used. The original tutorial can be found here.
I wonder if I can take much better photos if I get myself a SLR camera? Or is it because my lighting and techniques aren't up to scratch?
See also:
Anime Figurine Photography! Part 1
Collecting figures is a lot of fun and part of the fun is getting to show them to other people who might enjoy looking at them. Sure most of your friends will humor you, if they don’t make fun of you first, so it’s not as much fun showing off your brand new figure to them. As with many things that appeal to a certain crowd, like anime and video game character figures, sharing the joy often means going online and for that you need pictures. This blog entry is a tutorial on how to better show off your figures to other figure enthusiasts on the net by taking better photos of your collection to share.
Good photography is good lighting. A lot of people think that good lighting is expensive. Wrong. The best light source for photography is free. The sun! If you’ve got a backyard use it. Shoot in the morning or an hour or two before the sun sets for the prettiest light. Those looking for the quickest and easiest way to take pics of your figs, well there you go. But if you’re in the city or in an apartment and feel a little too funny about taking a half naked anime babe outside for a photo shoot while people walk by wondering what kind of freak totes a half naked anime babe out in public, this means you’re shooting inside.
It takes a little setup, but really all you need for an indoor lighting setup are two desklamps, a couple of big sheets of construction paper in different colors, a cardboard box, some tracing paper, and some tape. Many of you have tried the desklamp thing and gotten results you weren’t that happy with, but if you use them right, you can get some good results. The best type of easy indoor lighting is a daylight balanced (aka, full spectrum) light source, because it’s close to daylight in color and it burns relatively cool, which is a plus when shooting PVC. You can use normal lights, but just watch for overheating your figures and calibrate your camera’s white balance settings accordingly.
A lot of full spectrum desklamps are supremely overpriced, but there are cheap options out there. I bought a daylight compact florescent for a normal desklamp for about $10 USD at Lowes (they don’t seem to have it on their website, but they have them in stores). I also use a cheap one from Sam’s Club and it’s great (unfortunately they no longer sell it), it’s even better when I use it as a normal desklamp. It’s 27-watts, which is the equivalent of 150-watts of incandescent light. You’ll need about that much light if you don’t want to use a tripod (if your hands are shakey rest your hand on the table and rest the camera on top of that).
Update: Some bulbs are being called daylight, that really aren’t. The best thing to do is look at the color temperature rating on the package itself. What you want are bulbs with a color temperature between 5,000K and 6,000K to get the best color balance.
It’s helpful to have a second light from above (one that’s weaker than your main light) as a hair light, but you can use a normal floor lamp or a clamp swing arm desklamp, one of these is probably already in your house. My hairlight is a 75-watt light, so half as strong as my main light. The ratio doesn’t matter that much since you can move the light to get more or less intensity.
Anyway, the typical setup for taking a picture of your figure is:
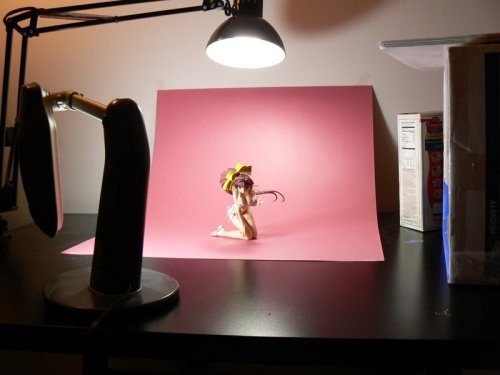
You’ve got your main light at about a 45 degree angle from the figure and the weaker lamp from above and slightly behind the figure (ignore that stuff to the side for now). You set Mizuki down on a colored paper backdrop and you’re even in macro mode and have properly white-balanced your camera when you take your picture and it still sort of comes out blah:
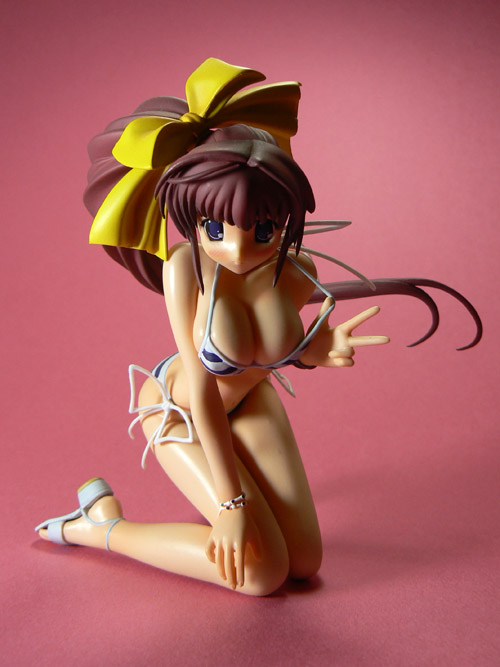
It’s in focus and all, but it looks like some schmoe took a picture with a cheap-ass desklamp from Sam’s Club. The main reason is the light is hard, leaving a highlight that screams plastic and shadows that are too sharp and deep. Hard light is not flattering, so you need to soften it with a diffuser. A diffuser is pretty easy to make. Basically, all you need is a cardboard box, some tracing paper, and some tape to fix the paper onto the box.

A diffuser is a filter which you shine the light through to soften the highlights and shadows so that it blends with everything in between a little more smoothly:
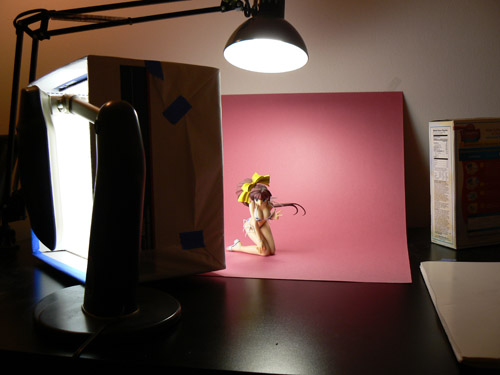
Okay, so the lights are in the same exact position and so is the figure. Here’s what the diffuser does to the highlights and shadows:
Okay, the light is a lot softer now, the shadows less harsh, the glare less defined. It’s getting there, but needs something to make it less dingy. The third piece you should use is a reflector to make the shadows on the dark side of the figure a little less dark. It’s tempting to use another light on the other side, but what that does too often is eliminate shadows altogether, which totally flattens the figure making those round shapes less three dimensional. A piece of white posterboard or even a sheet of aluminum foil bouncing light back onto the figure is usually enough to lighten the shadows a little bit.
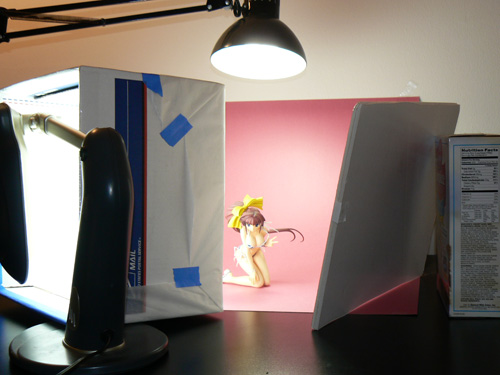
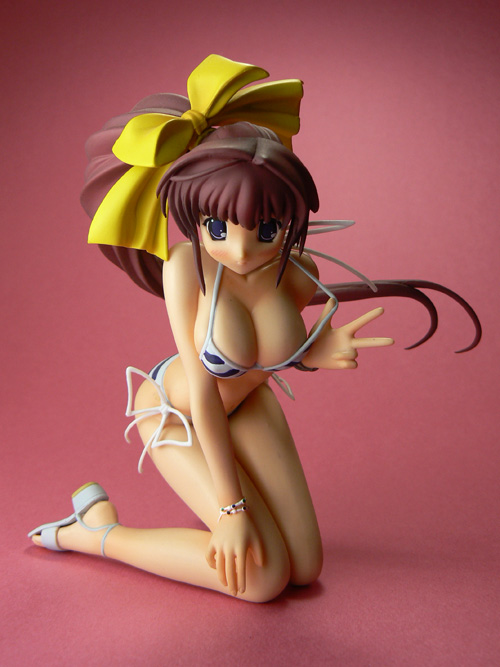
So it’s a little cramped with those boxes and the posterboard reflector (the purpose of the Betty Crocker chicken and dumplings box is to hold up the reflector, fancy setup indeed), but it’s worth the small bit of effort to set up and shoot. Here’s the result of this setup:
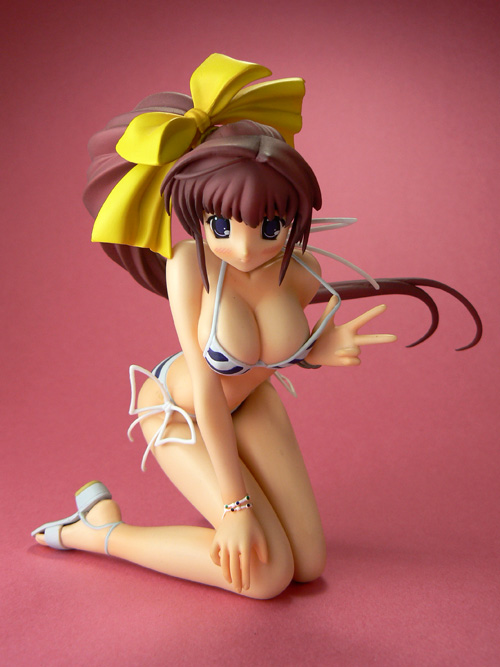
The reflector leaves the deeper shadows pretty dark, while the larger and more open shadow surfaces were lightened up a little bit to remove some of the dinginess. It also made the transition from mid-tone to shadow a little smoother.
You can get different moods by moving the lights around or by using a shallower diffuser. Sometimes you want a harsher highlight to simulate glistening skin, for example. Sometimes you want deeper shadows. Anyway, you don’t need expensive photographic lighting equipment or an expensive camera to get some pretty decent results.
Hope I was able to help.
posted by Cloud at 12:02 AM
![]()
![]()
0 Comments:
Post a Comment
<< Home